Welcome to the third and final page dedicated to our XW Falcon restoration. Although there's still much work to do, the end is in sight. This page will cover the final stages... teething issues, interior fitting out, bits and pieces here and there which need to be done to complete our project. Once finished, we will visit a RWC tester and all being well, get our newly restored Ford back on the road where it belongs...


4/5/15: Final fitting out is taking a little while as there are some expensive items to purchase. Exhaust system, bumper bars, tyres... and the list goes on. I bought these tyres before I was ready for them as they were offered for a reasonable price. Prior to fitting them, I tried my brothers original Mustang wheels to see how they looked. Truthfully, I've been a little slack with uploading pictures. Since video documenting, I find that I should have taken more stills... will upload more soon.
20/5/15: I've just uploaded Part 23 of the video series. It has taken a little longer than the others as there's been a bit to cover. The only thing that held me up was a bumper bar which was sent to the re-chroming shop... turn-around was too slow so I didn't bother trying to include it in this chapter. Part 23 has ended up being half an hour in length and contrary to what I said, will be followed up by a dedicated interior video, before the final one in a couple of months. The deadline for this car is the 1st November 2015 - a significant amount of time remaining, but with some expensive items yet to purchase on the list, will still be upon us before we know it.
20/5/15: I've just uploaded Part 23 of the video series. It has taken a little longer than the others as there's been a bit to cover. The only thing that held me up was a bumper bar which was sent to the re-chroming shop... turn-around was too slow so I didn't bother trying to include it in this chapter. Part 23 has ended up being half an hour in length and contrary to what I said, will be followed up by a dedicated interior video, before the final one in a couple of months. The deadline for this car is the 1st November 2015 - a significant amount of time remaining, but with some expensive items yet to purchase on the list, will still be upon us before we know it.


20/5/15: Moving along quite well, although the interior items that I thought would be such good clean fun is proving to be a pain in the neck. The following are some photographs of our progress to date. I'm currently working on the seats and having some issues here and there. The rear seat is tentatively fitted, but may require more fettling here and there.


20/5/15: A sign of more things to come...


9/6/15: I welded up a couple of small issues to the drivers seat squab frame. Looking at the frames, it became apparent that although they're structurally excellent, there was no way I could clean them up sufficiently well for paint. So, last week I delivered them to a media blaster to clean. They will then spend some time at the powder coaters before finally receiving their lovely new XY Fairmont Saddle coloured upholstery.
8/7/15: Lots of bits and pieces have been attended to. Jason has finished trimming the seats and has extensively modified the frames to suit the XY Fairmont covers being used. I initially thought early bucket seat frames were at least similar, but I was wrong. There will be a detailed account in the final video chapter yet to be posted. I also initially intended to use an innovative chrome system for the seat recliners and dickie seat uprights, but being 12 degrees with high humidity will adversely affect the coating, so I will get into that when the weather warms up, which will be after the roadworthy inspection. Carpets and seat belts are now installed and looking terrific, although it appears that the Saddle colour match I obtained to paint a lot of interior components was wrong... never mind, I am still most happy with it. The front seat squabs are easily fitted after I've messed around with the recliners.


9/7/15: Today marks two years since I bought the car and shot the first video of it with my daughter. The car sat for eleven days while I prepared the garage for parts storage etc, and I began disassembling it on the 20th July 2013. I estimated the restoration to take two years and it will be slightly over that... not because of a lack of time, but financial constraints. The estimated finish date is the 17th September, with the deadline being the 1st November 2015.
11/7/15: With the interior virtually complete, it appears that the paint I had initially matched is closer to XW Saddle than XY Saddle which it is meant to be and shows up particularly in artificial light. Whatever the case, I'm completely cool with it and delighted with how the car's taking shape. I still need to fit the interior rear view mirror, the woodgrain trims to the glovebox and surrounds and the sun visors before I close the book on this one. I have also removed the horn ring to sort an issue out with that.


15/7/15: Almost there... I polished and re-fitted the rear bumper so the exhaust shop can ascertain the correct tip placement. I found that I fitted the horn contact terminals behind the horn ring incorrectly, so have rectified that and it now works well. I also need to dust everything off inside the car... not looking all that clean. So, basically, we're down to a new rear bumper, a tailshaft, a woodgrain kit for the glovebox and an exhaust system and we're ready to send the old girl over the pits for a roadworthy. The end is nigh dear friends...


11/8/15: Well, the exhaust is all fitted... a tad more expensive than predicted because I hadn't bought any hangers so they sourced them from a supplier I don't use. The exhaust sounds good but is a tad louder than I would have liked. There were also some issues that arose since it was fitted. Namely the rear rubber brake line and fuel lines were running a little too close to the left hand tail pipe. I have sorted those items out today. A front end alignment was also carried out and the aligner went to straighten the wheel which I decided to do instead. So, before the car is taken for its roadworthy examination, I need to attend to the following:
* Repair the indicator that isn't self cancelling as it should.
* Bleed the rear brakes since I disconnected them to make an extension bracket for the clearance issue mentioned above.
* Mount or tie up the flasher can, as it's swinging around.
So these minor issues need to be sorted by the end of the week to meet my RWC appointment - trouble is, I'm working late every night and next weekend for our school production. In all, I'm delighted with how the cars' going... nice and toquey and very tight, just like a new car... it even has a strong "new car smell."
20/8/15: A hectic day at work, that ended with having to collect the car from the RWC tester... and it passed with flying colours! So on arrival home, I filled out the Club Permit application and Declaration forms and posted them, along with RWC to our club Vice President.
There are still a few small details which I'll address later; some stainless trims I'm not happy with, padded windlace joiners and one or two other small items. So with its Roadworthy Certificate in hand, I'm going to call this restoration complete. It all began on the 20th July 2013 and concluded today on the 20th August 2015, so a month longer than initially predicted.
24/8/15: Well, a trip to VicRoads after work marked the end of one chapter and the beginning of a new one with this car. With the days of it being laid up and worked on in the garage now behind us, it now has the legal right to be on the road... which is where I intend to derive the most pleasure from it.
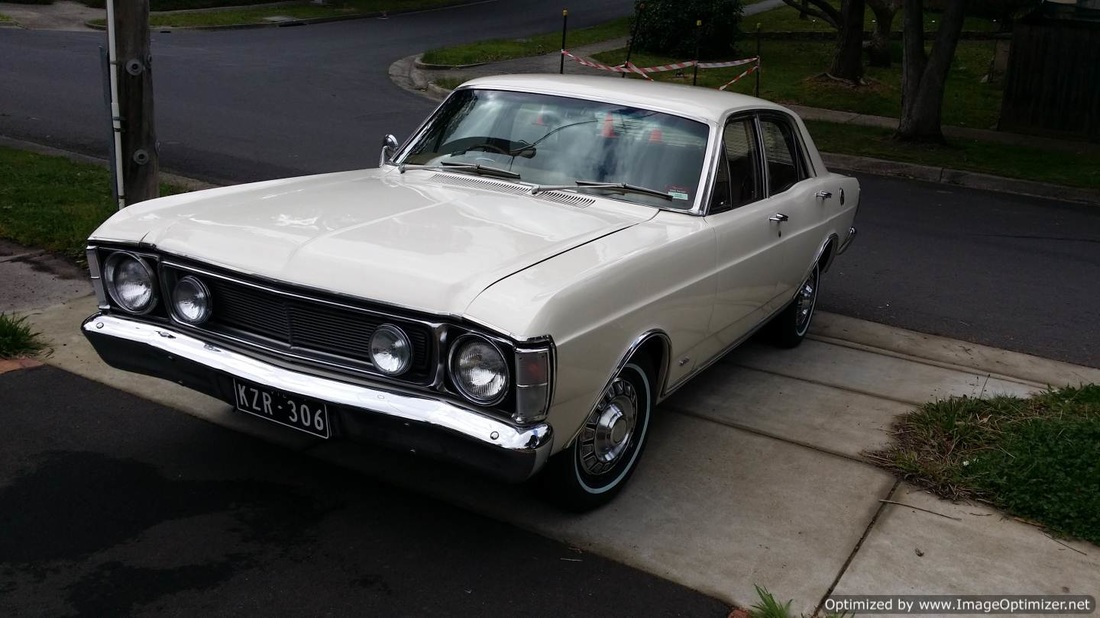
31/8/15: So here's the inspiration for the build... My fathers old XY Fairmont. It's pictured below circa 1972 when it was still new. I paid a visit to the current owners of the house to ask if they minded me taking these pictures of the XW parked in the same place. They were wonderful and moved one of their cars to allow me to do it. There's a lot of fond memories tied up with the XY Fairmont and the man who owned it. In fact, from the time I first drove the XW in it's sad state back in July 2013, I knew precisely what I was going to do with it. My XW was to become a tribute car.


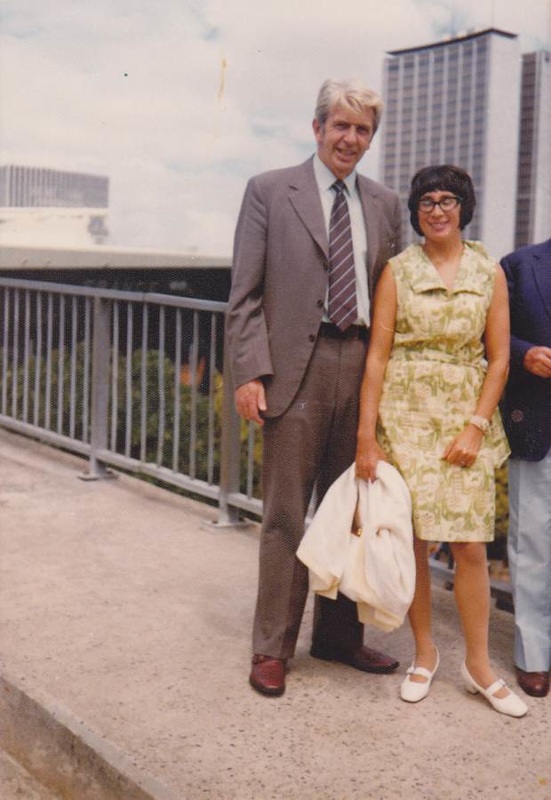
And here's the man I dedicated the build to... my father Athol Anderson. He's pictured here with my wonderful mother Norma. This photo was taken in Sydney in 1974, when they went to visit my aunt as her cruise ship docked. Although thirty years have come and gone since we lost him, we all still speak of Dad and miss him. I would imagine if he knew about the car I'd built for him and the fact I'm writing about him, he'd probably tell me to "knock it off."
The finished product. This is the biggest build I've tackled and with no exaggeration whatsoever, has been a pleasure. It's a peculiar phenomenon that something so difficult can appear easy when emotion and focus play key roles.
I hope you've enjoyed this restoration, I've had a ball with it. So on that note, I'll sign off.
Cheers Peter
